Checklist App - Part 2
Reading Time: 23.42 minutes
Important Notice
Please take note that this entry is the continuation of an ongoing lesson Checklist App so make sure you completed it first.
Arrays
To continue, let us discuss about arrays further.
From the previous chapter, we declared an empty array and we inserted element to the array each time the button is pressed. Then after learning that we can get use of the innerHTML property of list, we can inject html elements to it. The only question is what do we insert.
Remember previously as well that we tried to insert a hardcoded string of html code to the list, that is what we will basically do. But first, let us dive into more details about the array, how to get data and how to iterate through it.
Accessing Data
Say we have the following array
let items = ["item 1", "item 2", "item 3", "item 4", "item 5"];
To represent them in memory
| Item | Index |
|---|---|
| "item 1" | 0 |
| "item 2" | 1 |
| "item 3" | 2 |
| "item 4" | 3 |
| "item 5" | 4 |
They are ordered like that and index of the first element starts at zero (0).
To access an item in an array, you need the index of the element. The syntax for that is this
// Accessing the 3rd element (index 2)
const thirdElement = items[2]; // Value will be "item 3"

// Accessing the 4th element (index 3)
const fourthElement = items[3]; // Value will be "item 4"
You put the index inside the square brackets.
In accessing arrays, make sure that you don't access the index that is out of scope of the array or you will get an exception error.
console.log()
In javascript, specially inside the browser, we can take advantage of the function console.log(). This is a function usually used for debugging purposes. What it does is that it prints out what you give it, to the browser console.
To demonstrate the accessing of array elements, we will use the browser console in displaying values instead of the window.alert. This will give us more flexibility.
If you stopped your live server, please start it again so we can run our app in the browser. Now let's run it.
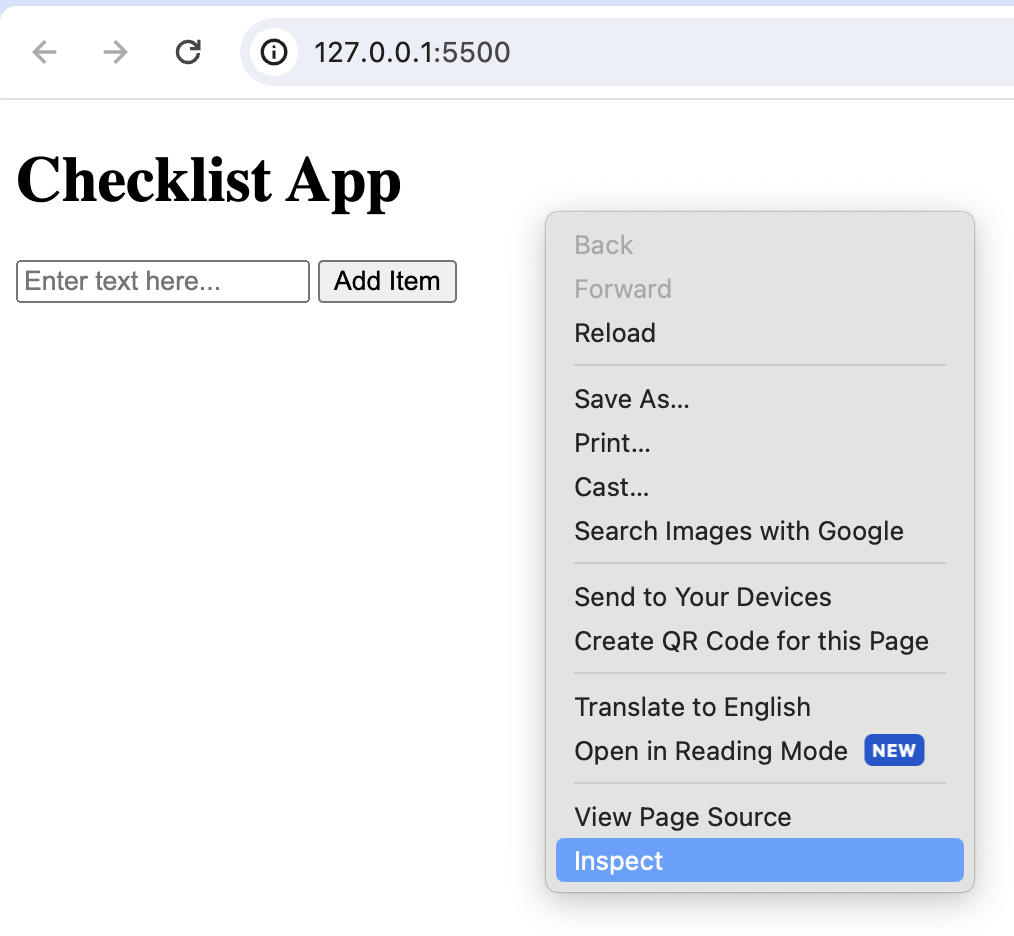
In the browser, any area that is displaying the HTML page, right click on in and select Inspect from the context menu. The inspector pane will appear on the right side of our browser.
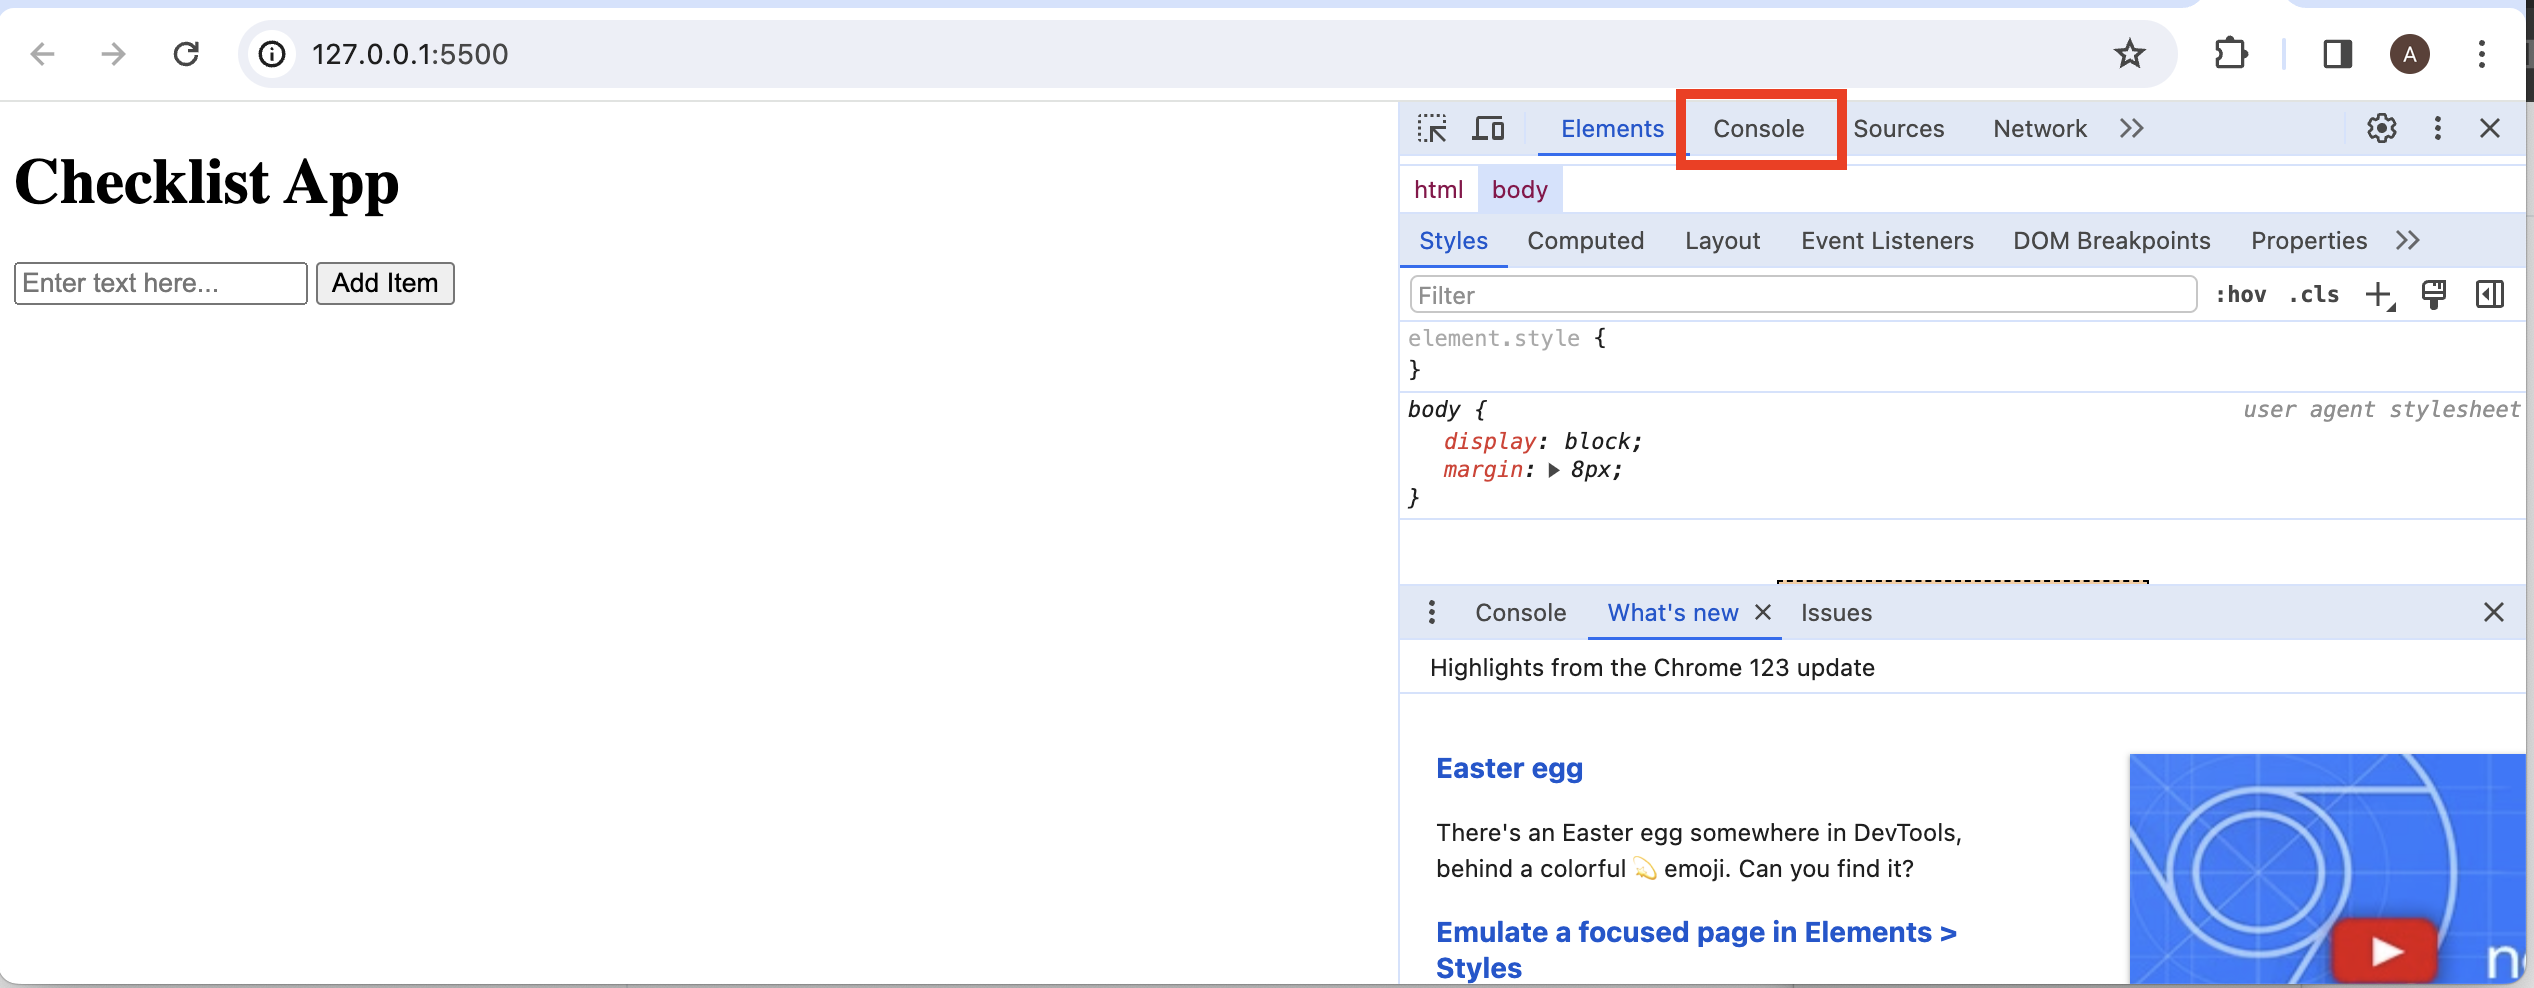
After that, click on the Console tab as highlighted in the red box above and the browser console will be shown.
Now with our existing code, everytime the buttonClicked is called, let us print the value of the array to the console with
console.log(items);
So inside the function, let's add the above code,
function buttonClicked() {
  inputText = inputBox.value; // Put the content of input box to the variable

  // Add item to the array using Array.push method
  items.push(inputText);

  // Print items to the console
  console.log(items);
}
Let's recap this,
- On line 2, we get the content of the input box and save it to
inputTextvariable - On line 5, we add that content to our
itemsarray - On line 8, we print the array
itemsto the console.
Let's test the app now. Input some items to be added to checklist in the input box and click Add Item button. Do this several times and you will see the array being printed in the console but notice that the array increases in content and size.
Iterating Through Arrays
Since we proved that our items array is being populated when we click our Add Item button, we then have to learn how to process the elements in our array.
In this section, we are going to use the concept of loops in programming. Looping is one of the control structures we use. What it basically does is, it performs a task over and over again until a certain condition is met. Let's try to have an example with our code.
In our code, let us first comment out the statement inside the buttonCliked function that adds item to the array.
// items.push(inputText);
Then let's put some values to our array, instead of initializing it with empty value, we will put some numbers in there just to demonstrate looping. We will remove them later.
let items = [1, 2, 3, 4, 5];

// Function to be called when the button is clicked
function buttonClicked() {
  inputText = inputBox.value; // Put the content of input box to the variable

  // Add item to the array using Array.push method
  // items.push(inputText);

  // Print items to the console
  for (let i = 0; i < items.length; i++) {
    console.log(items[i]);
  }
}
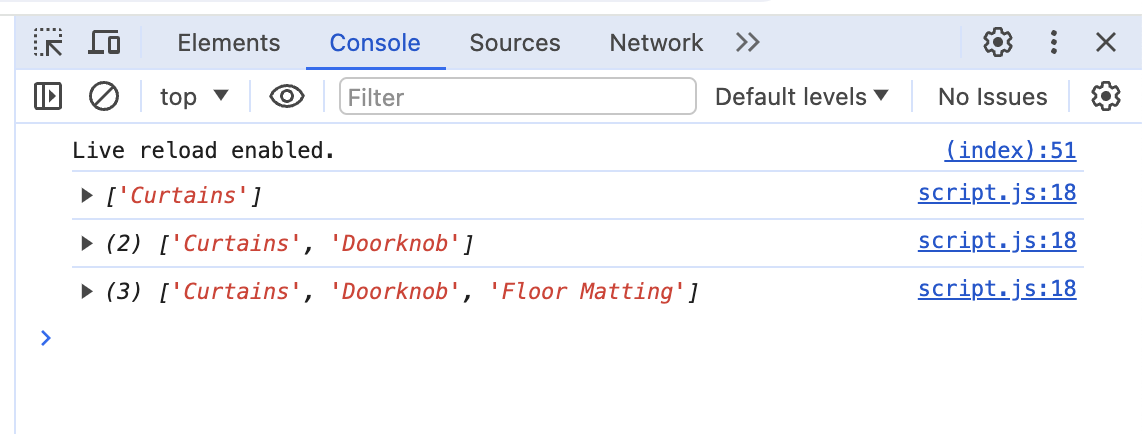
When you test the program and click the button, you should see the result in the console. Something like this
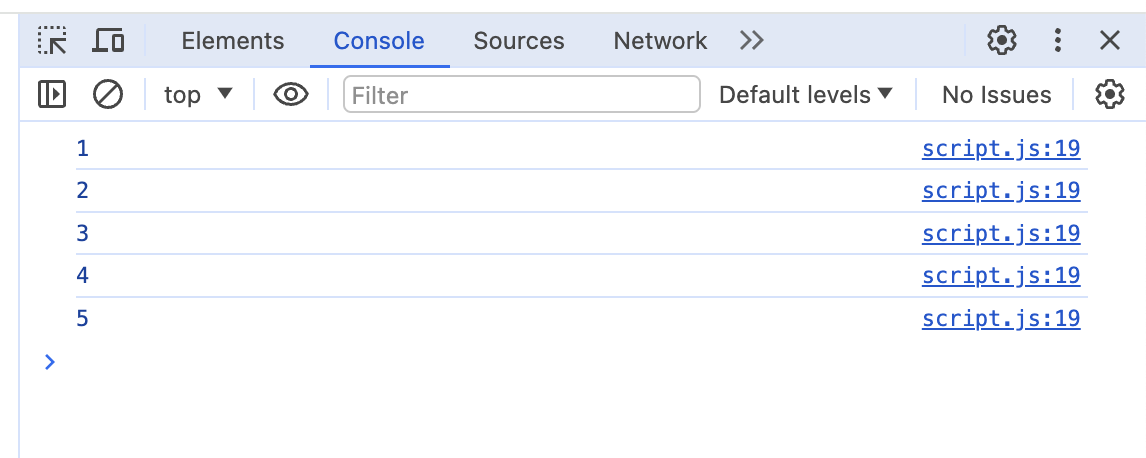
That is the printed elements of the array. In line 12, we console logged the element of the array by accessing it using an index. In this case, the index i is dynamically changing because of the loop action.
At the start of the loop
for (let i=0)
The i variable is initiated to be zero. In the for loop that we used,
- the first argument is
let i=0is the initial value of our iterator. - The next argument sets the condition for when the loop will only run, in this case, it will only run as long as
i < items.length. Or that the indexiis less than the number of elements in the array. - The third argument is the step of the loop.
i++tells it to add1toifor each loop.
We can set the step if we want. The i++ is shorthand for
i = i + 1;
This tells the interpreter to add 1 to the previous value of i and then the new value of i will be the sum.
So if the initial value of i is 0, the next value of it will be
i = 0 + 1; // or 1
Then for the next iteration
i = 1 + 1; // or 2
and for the next and so on...
I hope you get the idea. If you have any question about this, please feel free to post a comment below.
That was the explanation of the line
for (let i = 0; i < items.length; i++)
And then all the codes inside the pair of curly braces {} will run as long as the condition for the loop is satisfied. Since the comments are not executed, we will actually have the following codes running
Concatenation
Before we generate the html that we will insert in the innerHTML property of our list, let us learn first concatenation in javascript.
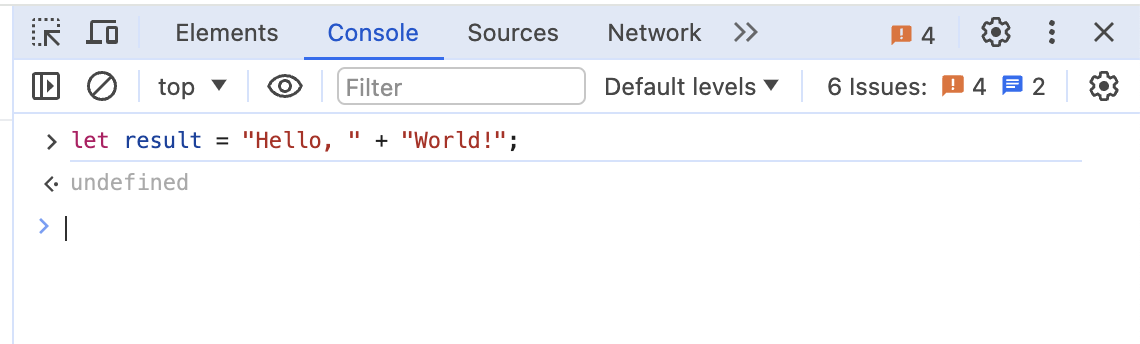
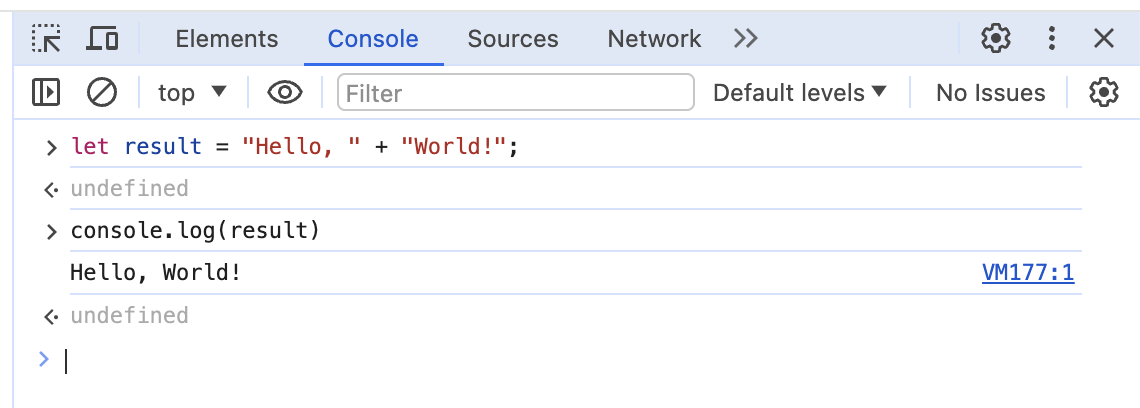
So to concatenate 2 strings, we just add them using the plus + operator.
let result = "Hello, " + "World!";

console.log(result);
Code inside the console
If you don't know it yet, you can code inside the console. Open your browser console. Then you can start typing in there. Separate your statements by pressing Enter or return
We can then use the console.log function to print the result in the console
Populating the innerHTML
Now that we got that out of our way, let us then create our html.
What we are going to do is,
- We will create an empty html string
- We will loop through our items,
- For each item, we will add the string
<li></li>that represent a list item and in between the tags is the input text that we will get from theitemsarray - And then we insert the
innerHTMLproperty
Our new code now will be
const inputBox = document.getElementById("item-text");
let inputText = "";

// Create a constant that will hold our list element
const list = document.getElementById("checklist");

// Declare an empty array
let items = [];
let listHtml = "";

// Function to be called when the button is clicked
function buttonClicked() {
  inputText = inputBox.value; // Put the content of input box to the variable

  // Add item to the array using Array.push method
  items.push(inputText);

  // Print items to the console
  for (let i = 0; i < items.length; i++) {
    listHtml = listHtml + "<li>" + items[i] + "</li>";
  }

  list.innerHTML = listHtml;
}
Tips
Look at the highlighted lines to check for the newly added or updated codes.
As you can see there, on line 20, we are appending a new list item in the string format to the listHTML that we created on line 9. Then on line 23, we are inserting that html code to the innerHTML property of our list. Let's try to run the program and add a bunch of items in the checklist.
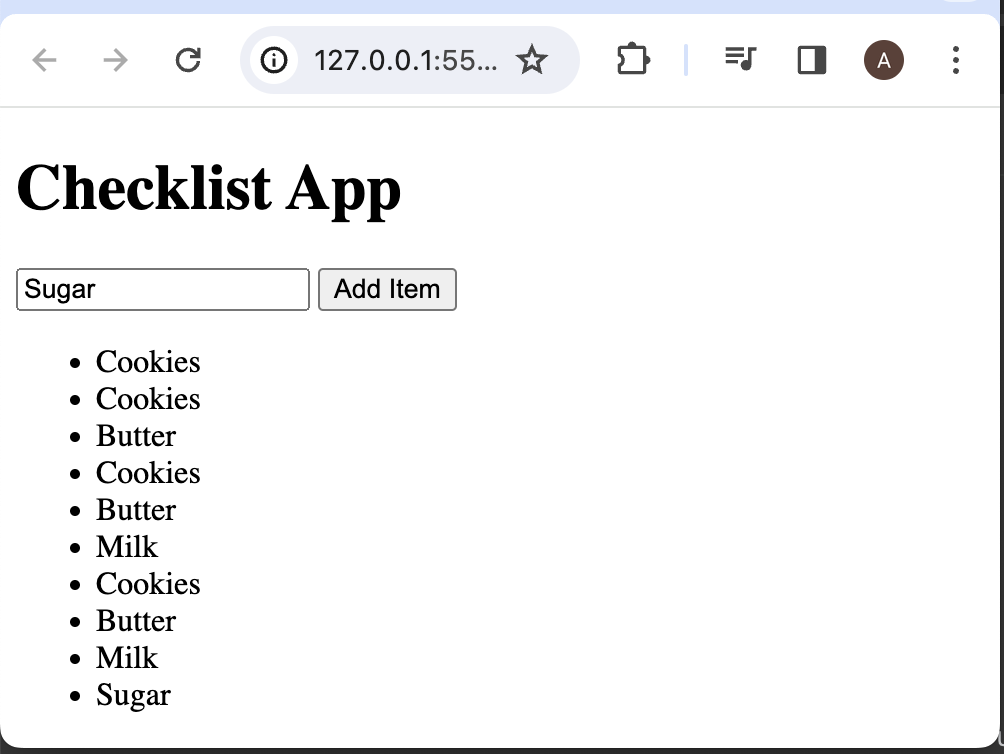
Can you see the problem here? Or as we call in programming, a bug.
Bug
A bug in programming is an error, flaw, or mistake in a program's code that causes it to produce incorrect or unexpected results.
The problem above can be illustrated by this 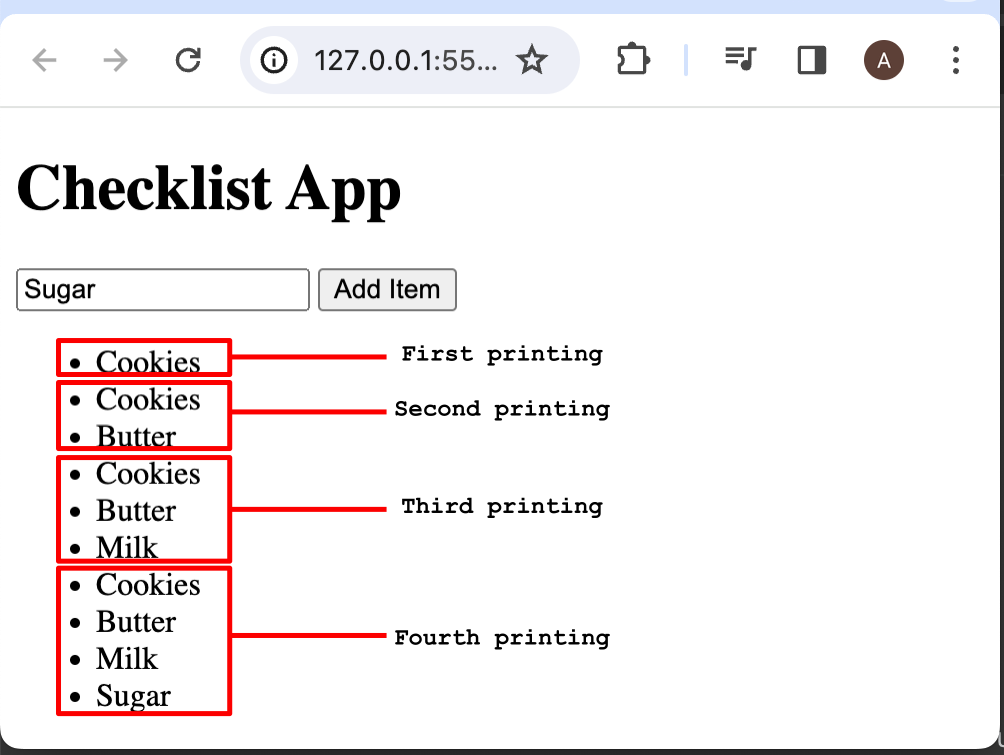
I entered item to the input box 4 times and clicked the button four times. The bug here is that, the program keeps the old value of the list and then add the newly generated list.
Our program, follows a specific instruction.
- It adds an item to the array
- It generates an html (series of list items) based on the array through looping
- Prints the generated html
The problem here is that, when we click the button, our listHtml variable would still have the value from the previous button click event and we are appending a newly generated html string to it.
So to solve this problem, everytime we click the button, everytime the buttonClicked function is called, let us first set the value of listHtml to an empty string. This way, we somewhat resets the html string. Let's try that out if it solves the problem.
const inputBox = document.getElementById("item-text");
let inputText = "";

// Create a constant that will hold our list element
const list = document.getElementById("checklist");

// Declare an empty array
let items = [];
let listHtml = "";

// Function to be called when the button is clicked
function buttonClicked() {
  listHtml = "";
  inputText = inputBox.value; // Put the content of input box to the variable

  // Add item to the array using Array.push method
  items.push(inputText);

  // Print items to the console
  for (let i = 0; i < items.length; i++) {
    listHtml = listHtml + "<li>" + items[i] + "</li>";
  }

  list.innerHTML = listHtml;
}
In line 13, we just set the variable listHtml to an empty string and
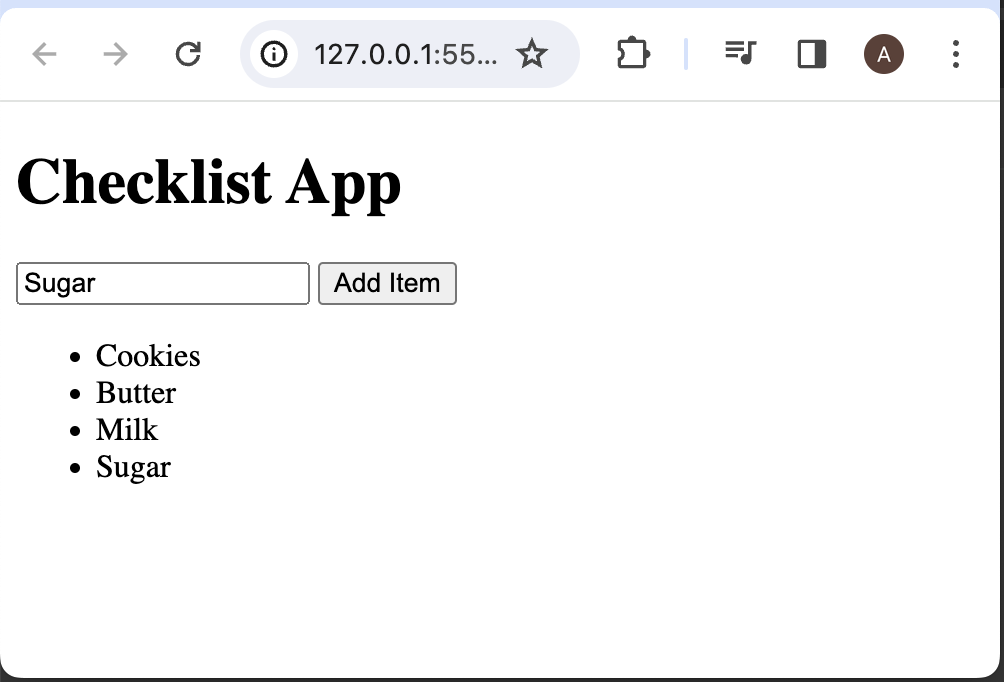
And voila! 🎉 🎉 🎉 Our program is now working as expected!
If you follow until here and made the program works as expected, congratulations!
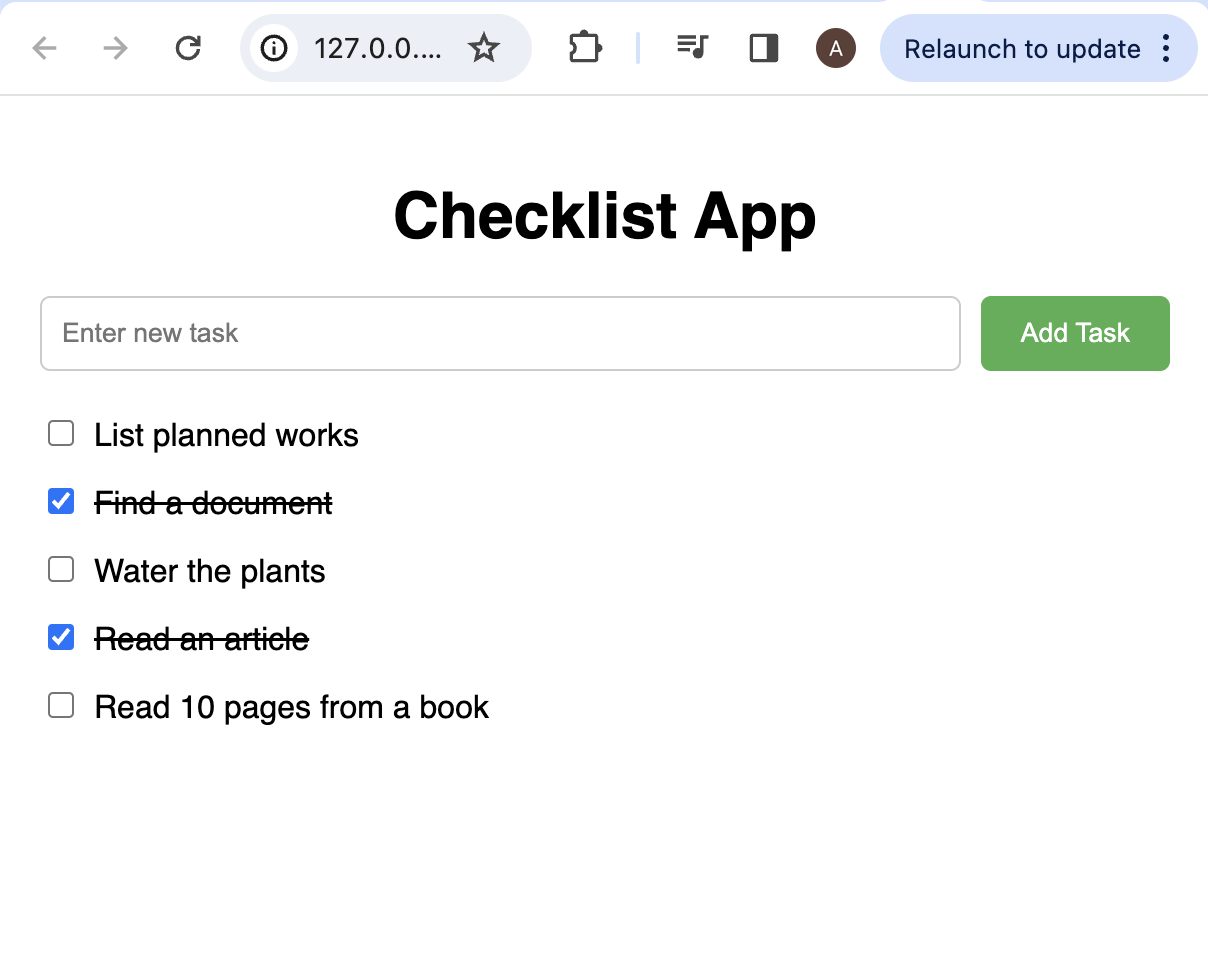
Add Checkbox
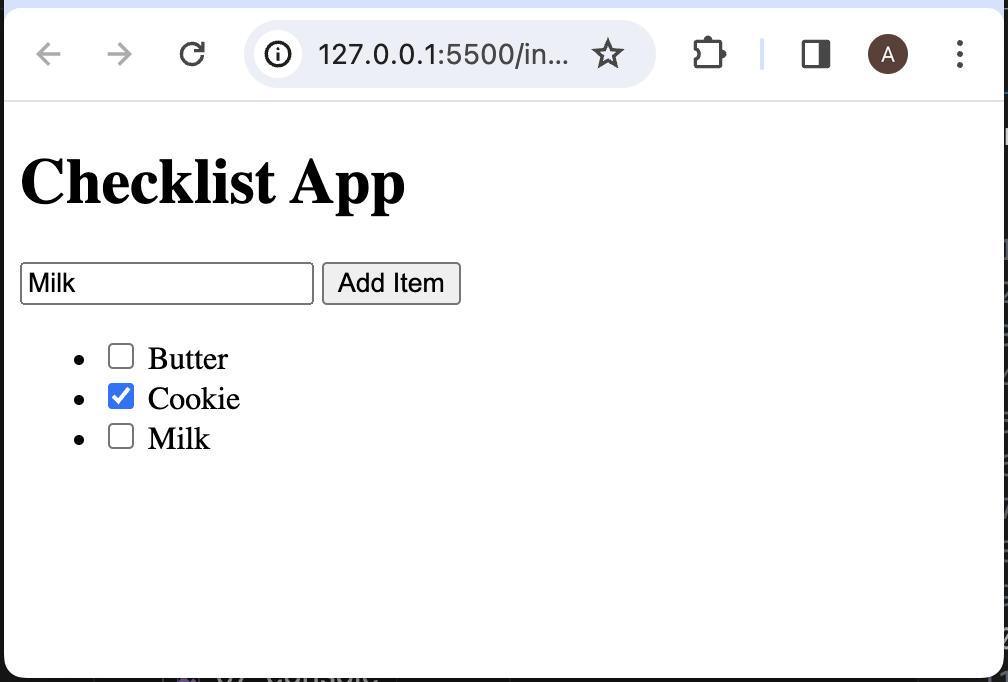
If you remember, our finished app has a checkbox to the left of a checklist item, we will be adding them now.
The syntax for a checkbox is this
<input type="checkbox" />
It is recommended that we always add label to checkbox inputs for accessibility. For this we need to have an id attribute.
<input type="checkbox" id="my-id" /> <label for="my-id">Checkbox 1</label>
This should look like this

The purpose of the label is that, when you click on it, it would also trigger the checking and unchecking of the checkbox.
Let's add it to our generated html. We will replace the text in the list item with that.
// Function to be called when the button is clicked
function buttonClicked() {
  listHtml = "";
  inputText = inputBox.value; // Put the content of input box to the variable

  // Add item to the array using Array.push method
  items.push(inputText);

  for (let i = 0; i < items.length; i++) {
    listHtml =
      listHtml +
      `<li><input type='checkbox' id='${items[i]}'><label for='${items[i]}'>${items[i]}</label></li>`;
  }

  list.innerHTML = listHtml;
}
In javascript, there is a shorthand for the code i = i + 1, aside from i++, we can also write i += 1. We can apply it to our code on line 10.
// Function to be called when the button is clicked
function buttonClicked() {
  listHtml = "";
  inputText = inputBox.value; // Put the content of input box to the variable

  // Add item to the array using Array.push method
  items.push(inputText);

  for (let i = 0; i < items.length; i++) {
    listHtml += `<li><input type='checkbox' id='my-id'><label for='my-id'>Item</label></li>`;
  }

  list.innerHTML = listHtml;
}
Can you guess what will this output? Yes, it will print the hardcoded "Item" to the right of the checkbox. To make it dynamic, we will insert the value of the element at a given index i.
From
listHtml += `<li><input type='checkbox' id='my-id'><label for='my-id'>Item</label></li>`;
to
listHtml += `<li><input type='checkbox' id='my-id'><label for='my-id'>${items[i]}</label></li>`;
Notice that we put the items[i] inside ${}. This is called a template string. Template strings allows to embed expressions or program statements inside a string that is surrounded by backticks ``.
If you examine the code, the statement above will be inside a loop that appends string to our listHtml variable. But notice that the id attribute of our input will always be my-id. Let us replace this with the index i instead and we will use template string.
listHtml += `<li><input type='checkbox' id='${i}'><label for='${i}'>${items[i]}</label></li>`;
This looks good to me. Let's incorporate it now to our code and test it.
// Function to be called when the button is clicked
function buttonClicked() {
  listHtml = "";
  inputText = inputBox.value; // Put the content of input box to the variable

  // Add item to the array using Array.push method
  items.push(inputText);

  for (let i = 0; i < items.length; i++) {
    listHtml += `<li><input type='checkbox' id='${i}'><label for='${i}'>${items[i]}</label></li>`;
  }

  list.innerHTML = listHtml;
}
When I ran my code, I get the following.

Did you have the same result? If you did, congratulations again!
Object in the List
Pretty nice right? Seems that we are getting near our goal! But wait...
Remember that our array items are just a list of strings? Does our program know if an item is checked or not? Sad to say it does not.
We can see that we can click an item and the checkbox will be checked, but that is it. Because it's a checkbox! Our program has no way of knowing the state of our checlist items.
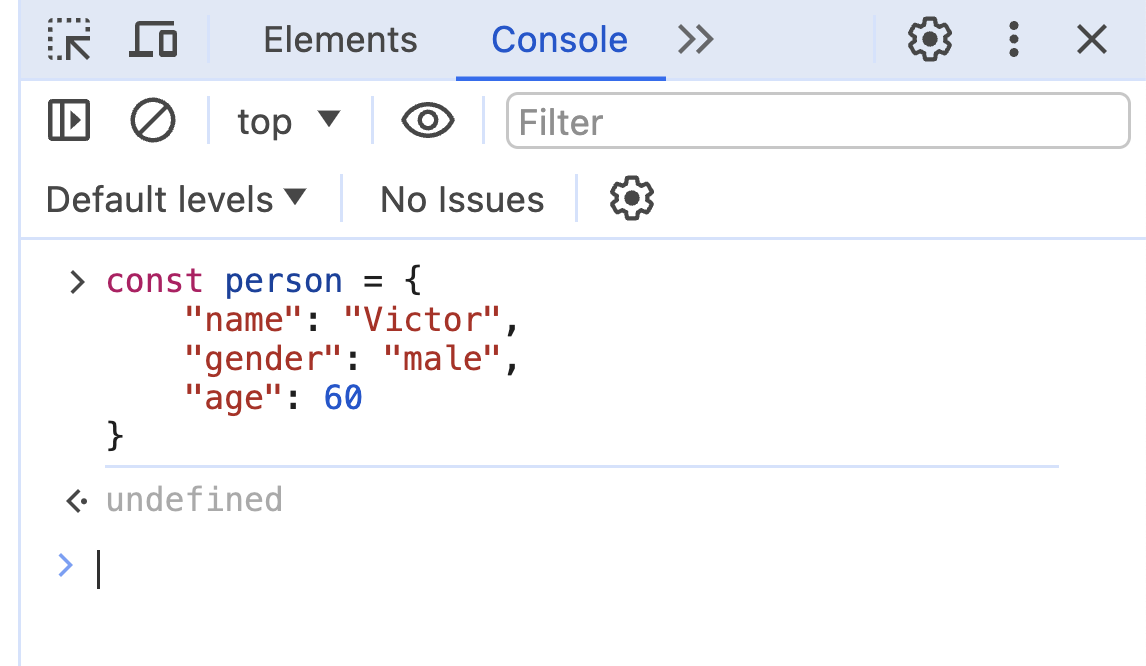
Let me introduce to you the concept of object.
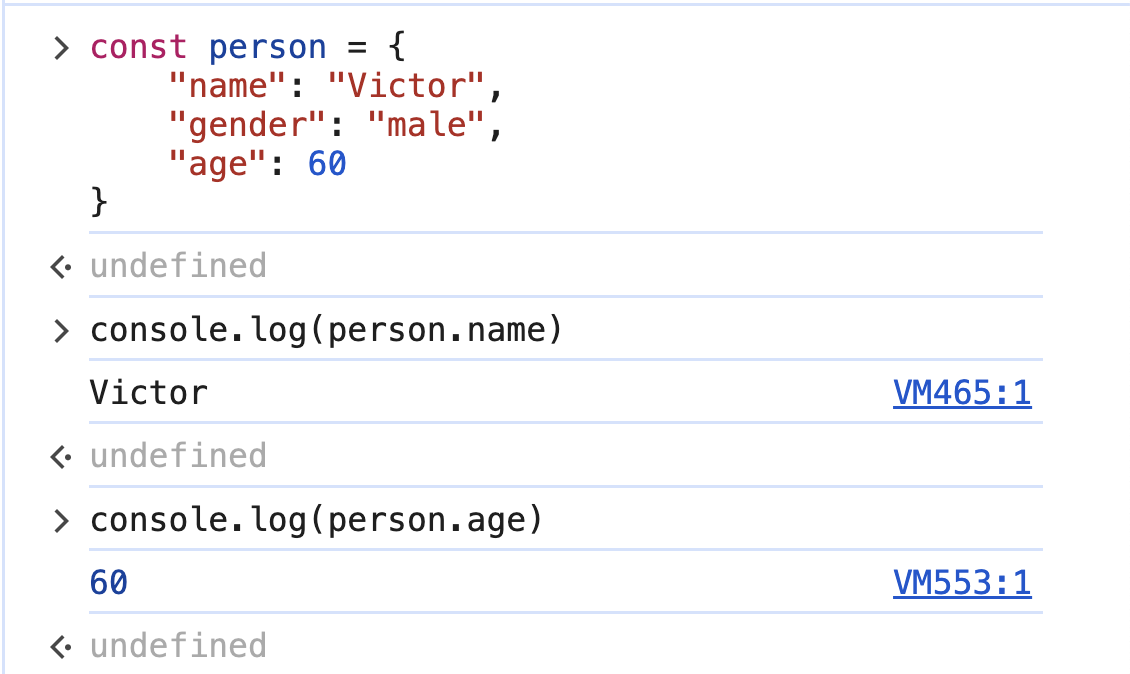
An object is a data type in javascript that holds a collection of properties, much like a key-value pair. To give you more idea, this is an example of an object literal:
{
    "name": "Victor",
    "gender": "male",
    "age": 60
}
Here, the name, gender, and age are the keys and "Victor", "male", and 60 are their corresponding values.
We can assign this to a variable or a constant to demonstrate how to manage and manipulate it. Let's open our browser's console and assign the above to a constant.
There are 2 ways we can access the value of a property in an object, either using dot notation
person.name;
or using the brackets
person["name"];
So let's try to access the name and age.
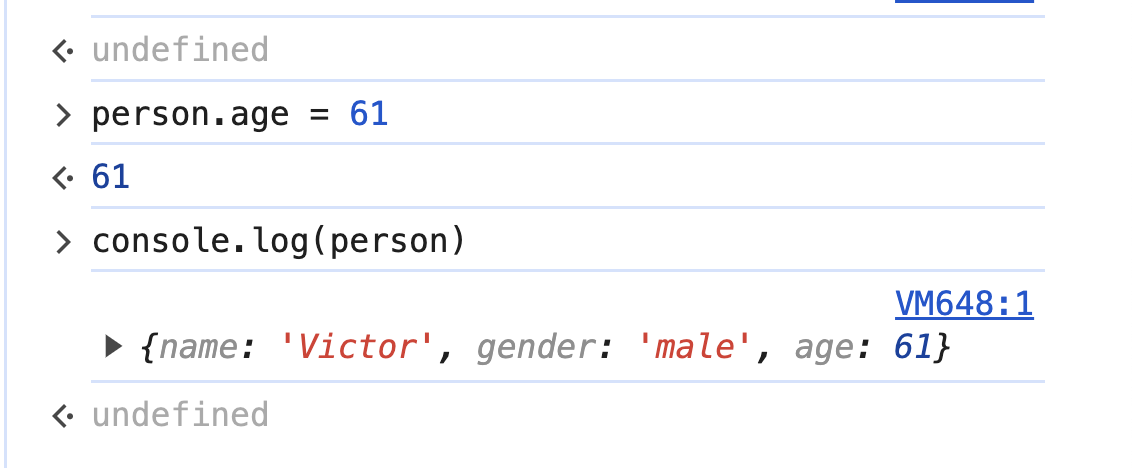
Let us also change the age from 60 to 61 using this
person.age = 61;
and then let's print the value of the object.
Having demonstrated this, we will now apply it to our app. We will change our items contents from just plain strings to list of objects.
To design this, remember that we needed the name of the checklist item and we need the state. So this could be either checked or unchecked. Let's create an object with this signature
{
    "name": "Butter",
    "checked": false
}
In this object, we will represent the checked state of an item using a boolean data type with the checked property. Everytime we add an item, we give it a false value by default, meaning it is not checked when we add it.
More on Function
Before we do it, let us first go back to creating and using functions. As discussed in the previous lecture Checklist App - Part 1, aside from being block of codes, we use functions for modularity. Meaning we can have separate utilities that we can use, not only single, but multiple times.
Functions also help us separate program concerns. For example, in our program, we can create a function that do one thing, to render the contents of our list. Actually, one of good practices for creating function is that we limit them to do just one thing instead of a lot of things.
So for this, we will create a function to render the list content and we can call it anywhere we want. Analyzing the problem, we can call the render function when clicking on the Add Item button so that the function for the button click event is only focused on the higher view of activities happening when the button is clicked.
Another instance of calling that render function would be when a user checked an item. This way, whenever the user checked or unchecked an item, the item object will be updated from the items array and then it will be re-rendered, showing the changes happed. So let's show that code for that.
const inputBox = document.getElementById("item-text");
let inputText = "";

// Create a constant that will hold our list element
const list = document.getElementById("checklist");

// Declare an empty array
let items = [];
let listHtml = "";

// Function to be called when the button is clicked
function buttonClicked() {
  inputText = inputBox.value; // Put the content of input box to the variable

  // Add item to the array using Array.push method
  items.push({
    name: inputText,
    checked: false,
  });

  renderItems();
}

// The render function to render the list
function renderItems() {
  listHtml = "";

  for (let i = 0; i < items.length; i++) {
    listHtml += `<li>
      <input type='checkbox' id='${i}' onclick='itemClicked(${i})'>
        <label for='${i}'>
          ${items[i].name}
        </label>
      </li>`;
  }

  list.innerHTML = listHtml;

  for (let i = 0; i < items.length; i++) {
    let checked = items[i].checked;

    document.getElementById(i).checked = checked;
  }
}

// Call when a checkbox is clicked.
function itemClicked(id) {
  const item = items[id];

  // Change the checked property
  item.checked = !item.checked;

  renderItems();
}
If we run the app it should now be working as expected
As you can see, it's as if it's just the same with the preview above, so what's the difference?
Well, now, our app remembers that a checked item is actually checked based on its property inside the object. We can notice this when we add a new item. When adding a new item, we know that the renderItems function is being called right? And when we add an item, the item with a checked state remains checked. That's one of the signs that the app remembers an object's state. So now what are we still missing based on the planned finished app?
The above code would be the our minimal working code based on the logic that we planned.
Let's break it down.
Lines 15 to 19 is the replacement of our previous code that appends string to the array. Now we append object.
At line 21, this is where we call the renderItems function. Everytime the buttonClicked function is called, we call the rendering of list after we add an item to our array. This ensures that we update the data first before we re-render the list.
Lines 25 to 44 defines the function renderItems. Lines 26 to 35 should look familiar because we've discussed it before.
Line 37 inserts the generated html to the html of our list.
For the lines 39 to 43, we are again iterating through the array of objects, then inside the loop, we have 2 statements. First we assign the value of checked property of an item to the checked variable then set the checked property to the document with the specified id at line 42.
Now for the lines 47 to 54, this is the function triggered when a checkbox is clicked or checked. This is defined on line 30 with the onclick event attribute of the html element input.
The function itemClicked reverses the value of the property checked. This happens at line 51 with
item.checked = !item.checked;
The code with the exclamation mark on the left gets the opposite of that value.
On the code above, if the value of item.checked is false, it will become true and vice versa.
I hope you got that all working, if not, just leave a comment.
CSS
On our list items, there are still small dots to the left of the checkbox right. This represents the items as list. But it's not on the final app and it would be better looking if it's not there right? We will now introduce you to CSS or Cascading Style Sheet.
We will be dealing with css in order to style our app so let's open our style.css file. Put the following codes into it then save and let's run the app.
ul {
  list-style: none;
}
We have successfully removed the list style using the css code above. The ul in the code is our element selector. It means it will apply the styles we provide inside the {} to all the ul elements in our html. We will not be discussing much about the syntax of css here because it can be easily found online. One of the main resources we can turn into is this MDN Web Docs - CSS.
We will only discuss what possible solutions we can do for our app, this way, our learning will be targeted and you will not be dealing with documentations and references that you don't need yet.
Conditional Statements
Next we will be needing is the line-through style for each item that has checked property. To achieve this, we need something in our html element. Instead of applying style to all the list items, we want to only apply the line through style to the selected items. Let's see how we can achieve it.
First let's think about how we can insert a class attribute to items that has checked property set to true. Let's go now into one of control flow structures in programming, the conditional statements.
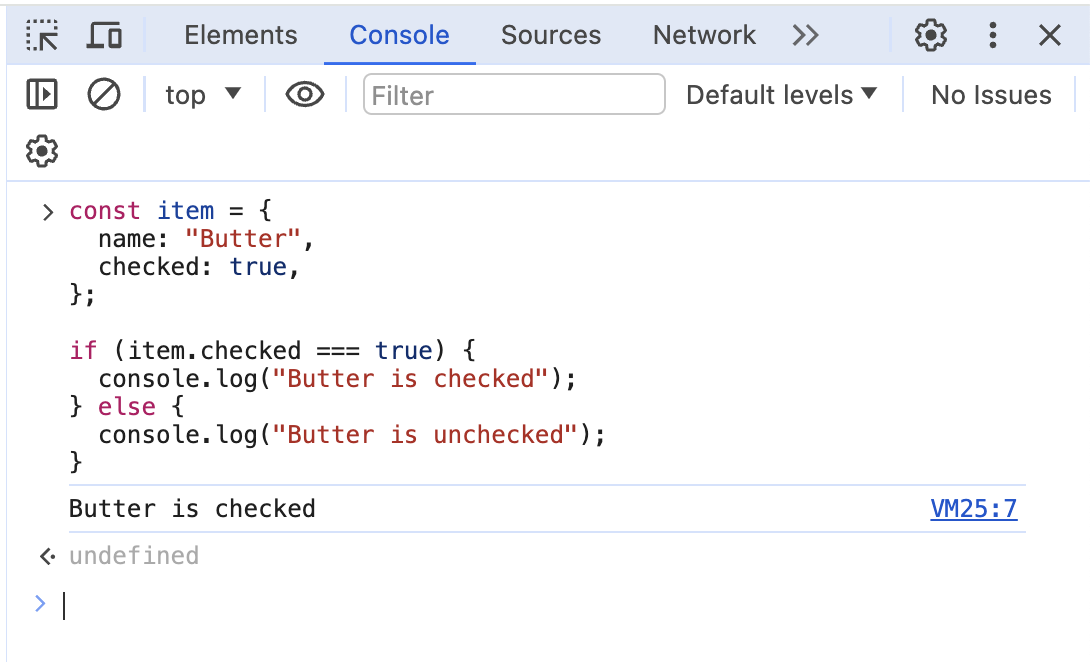
// Syntax for if statement
const item = {
  name: "Butter",
  checked: true,
};

if (item.checked) {
  console.log("Butter is checked");
} else {
  console.log("Butter is unchecked");
}
Let's paste the above code to our console
We created first a sample object that may represent a checklist item.
On line 7, we have what we call an if statement. This is one of the most used concept in programming. It helps us in teaching our program decision making. The syntax is straightforward, after the if keyword, it is followed by a pair of open and close parenthesis. Inside those parentheses must be either a value or a statement. If it's a value, it should have a data type of boolean.
Boolean
Boolean data types can have 2 values only. Either true or false.
If inside the parentheses is a statement, it should evaluate to a boolean result. For example,
if (2 == 2) // Evaluates to true
if (2 < 5) // Evaluates to true
if (2 > 10) // Evaluates to false
In our case, we just accessed the value of item.checked which is already a boolean value.
Inside the curly braces will be our code block that will only be evaluated if the value inside the parentheses is true. So if we review our code:
if (item.checked) {
  console.log("Butter is checked");
} else {
  console.log("Butter is unchecked");
}
If the value of item.checked is true, it will print the "Butter is checked". The else codeblock will run if all other cases are false.
Let's apply this now to our javascript code.
function renderItems() {
  listHtml = "";

  for (let i = 0; i < items.length; i++) {
    let className = "";

    if (items[i].checked) {
      className = "completed";
    }

    listHtml += `<li>
      <input type='checkbox' id='${i}' onclick='itemClicked(${i})'>
        <label for='${i}' class='${className}'>
          ${items[i].name}
        </label>
      </li>`;
  }

  list.innerHTML = listHtml;

  for (let i = 0; i < items.length; i++) {
    let checked = items[i].checked;

    document.getElementById(i).checked = checked;
  }
}
What we did here is that
- We created an empty string and assign in to variable
className. This later will be inserted to our html code - We tested if the current item being looped through has
checkedproperty set totrue, if yes then we will set the variable equals tocompleted. This is just a class name that we will use as class selector in our css code - Then on the
<label>element, we added a class attribute. That class attribute contains either"completed"or""since the default value ofclassNameif"". This is because in our conditional statement, we will only set the value of theclassNamevariable when the condition is true, if not, it will remain with its default value.
Now onto our css code, we will add the style for our class selector
ul {
  list-style: none;
}

.completed {
  text-decoration: line-through;
}
This will set the text style for our item. Let's give it a try

More CSS
Now for the finishing touches, we will add some more css codes to style our page. We will not discuss them in detail in this chapter
body {
  font-family: sans-serif;
  margin: 0;
  padding: 20px;
}

h1 {
  text-align: center;
}

ul {
  list-style: none;
  padding: 0;
}

.completed {
  text-decoration: line-through;
}

#checklist-form {
  display: flex;
}

#item-text {
  flex: 1;
  padding: 10px;
  border: 1px solid #ccc;
  border-radius: 5px;
}

#add-item {
  padding: 10px 20px;
  background-color: #4caf50;
  color: white;
  border: none;
  border-radius: 5px;
  cursor: pointer;
  margin-left: 10px;
}
If you use this css code, you should get the same app appearance the same as introduced in Checklist App - Part 1.
Congratulations 🎉! This is the end of the first app for our programming journey. I hope you learned something from this.
Summary
Now let's recap what topics we've discussed so far. After completing this chapter, Part 1 and 2 of the Checklist App, you should have learned the following:
- Structuring the view with HTML
- Connecting CSS and Javascript file to the HTML
- Programming Concepts
- Literals
- Variables
- For loop
- Conditional statement
- Concatenation of string
- Javascript object
- Functions
- Arrays
For any problems
If you encounter any problems or having any difficulty following this, please don't hesitate to drop your comments down below.